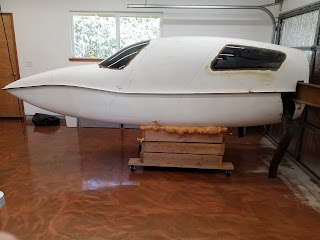
Installing the windows should be pretty straight forward; unfortunately, things went very sideways on my installation.
To start off, the build manual has you cut out the window wholes along the factory marked cut lines.
Easy enough.
With all three windows cut out, not including the door windows, the fuselage really starts looking like an airplane!
Next was to remove the inner skin and foam around the inside of the window cutout.
The manual calls for a 3/4" lip to allow plenty of surface to mount the windows to.
This was pretty straight forward. I found that a razor blade partly retracted to the desired depth did a great job opening up the inside lip, without damaging the outer skin.
Next, you cut out the windows to the size of the recces cut into the inner foam. I was unable to get pictures of this step, but it was pretty straight forward. Just hold window up to whole, and trace an outline of the opening on it. I found it cut best on a bandsaw with a metal blade.
Unfortunately, this is where things took a wrong turn. Silly me, I followed the manual, and I made things worse too...
The manual says to cover the windows completely with duct tape, to prevent getting epoxy on them and protect them during installation. I have gotten into the practice of using foil tape instead of duct tape, as it worked much better for doing fiberglass layups where you don't want the fiberglass to stick. This will soon present as a double negative...
For now it went well. The manual then has you cut up a bunch of popsicle sticks, into little wedges for holding the windows in place. First you temp the windows in and apply the wedges, then mark the outside of the tape where the window edge is, so you can then remove the tape where it is supposed to bond to the fuselage skin. This is where I first realized my mistake. I scored the tape along the marked edge of the widow opening, and started having real trouble peeling the foil tape off from the window. The foil tape only came up in tiny pieces and often needed a razor scraper to come up! It really stuck to the windows great, better than it holds together itself. For the tiny edge it wasn't too bad, but I knew things were gonna get ugly soon.
For now, it was on with the show! I used the wooden wedges as the manual suggests to very good effect. I put a thin bead of epoxy on the inside of the window lip, for a surface adhesion, then little beads of epoxy slurry between the wedges to hold it firmly enough to remove them. This way the wedges held the window tight, but also don't get permanently bonded to the fuselage!
Once the epoxy hardened, I removed the wedges and the windows were well bonded in place. They still needed reinforcement, but for now they felt solid.
I got to thinking, and really didn't like the tape method. In fact, I didn't really see the point, if you work carefully and clean up after you really shouldn't need the tape anyway! Therefore, I installed the front windscreen sans tape, and actually was faster, easier, and had no negative side effects!
With the epoxy done curing it was time to remove the tape from the windows.
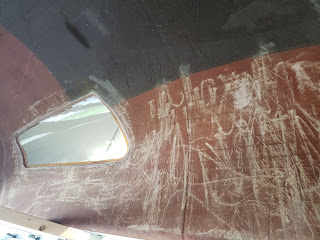
I only logged a dozen or so hours of time spent peeling the foil tape, but it was a few dozen hours total of painstakingly slowly peeling and scraping the tape, often times in little pieces smaller than a pinky nail! The razor scraper was leaving scratches, but sometimes was still the only way to catch an edge of that thin foil. Removing the foil tape was on me, as the manual did say duct tape, which at least would have peeled up easily.
Even duct tape though would have left the same horrible mess of tape goo though... This was a horrible idea to use either type of tape! What was the factory thinking??? So I talked to the factory and found out they had no idea that was even in the manual! They also thought is sounded like a horrible idea too! They do what I did with the windscreen and don't use anything, but if people want something they recommend masking tape! I'm really starting to think the manual is just there to mess with builders! Maybe not really, but it sure does feel that way.
Some parts of the glue residue was more of a thick rubbery goo, but it was BAD!
Some areas were worse than others...
Thanks to the VOBA forum and a great document from the Van's Aircraft site, I decided to do a scientific experiment as to which of the top methods was the best. The top to methods I found were using WD40 and mineral spirits; I also learned DO NOT USE DENATURED ALCOHOL!!!
Therefore, I applied WD40 to one window and mineral oil to the other. I let them soak for about 4 hours before checking on them the first time. I found the WD40 was a greasy mess, but still there; while the mineral oil had evaporated cleanly, but wasn't really doing any soaking. I then reapplied both and worked them a bit. I found the mineral oil cleaned the lightest deposits cleanly and quickly; however, it wasn't doing much to the thick heavy deposits. The WD40, on the other hand, was a greasy mess but seemed to be breaking down the heavy deposits slowly, very slowly. I checked a few times throughout the day and found the same to hold true; therefore, I soaked both sides in WD40 overnight.
The WD40 was a greasy mess that made things worse at first.
The next day I still had a LOT of scrubbing to do, but my work was paying off, and the windows were getting clean!
Eventually the deposits would come up, but the WD40 left them greasy, so I then cleaned them with the mineral spirits. This cleaning also get any little deposits the WD40 grease was hiding. FINALLY, the windows were in and done.
BTW, the front screen, was ready to finish as soon as I pulled the wedges out! A little wipe with mineral spirits when I was done applying the epoxy and it was good!
The windows were clean and glued in place, but they still needed reinforcement to hold them in at Velocity speeds!
When I moved the kit from Hawaii to Tennessee, the windows were only glued in, like this, and had no trouble withstanding the up to 80mph drive; however, 80 is not 200+!
Now for the real bonding in of the windows. Once again things were straight forward and issue free. I really love my custom fillet tool I made previously, as it made the perfect fillets with the epoxy slurry quickly and effortlessly!
The corners needed a little more finesse, but they turned out fine.
The fillets don't need to be perfect, as the kit comes with fiberglass trim pieces at add when you do your interior, so this is just making sure there is enough room for the trim.
For the top of the window I found adding extra filler to the mix to make it really thick helped it stay upside down without drooping.
With that, the windows are officially installed!
The last thing I did was to clean it all up and smooth it all out.
I used a combination of a belt sander and 6" orbital to smooth and round the edges, and smooth any adhesive slurry off the inner skin.
I also used this time to smooth all the wrinkles out of the inner skin and give it a slightly smoother feel through most of the interior space.
My goal was not to make a nice finished surface, just to sand out the "wrinkles" and take the worst of the roughness out of the skin. This will make working in here much nicer, and prevent fiberglass cloth from snagging.
With that, the window installation is complete.
I will say, I really wish these windows could be installed less permanently; however, I understand they are a structural element, and this is the lightest way to mount them. Just REALLY hope I never have to replace them!
Now, the fuselage is ready to be put together!


